Migas: My Favorite Weekend Breakfast

In Spain and Portugal, migas is a dish of eggs and stale, leftover bread. The bread may be torn into crouton-sized pieces and pan fried in cooking fat. The dish is often seasoned with paprika. Migas means roughly: crumbs. The dish may be made with vegetables and chorizo as well as the bread.

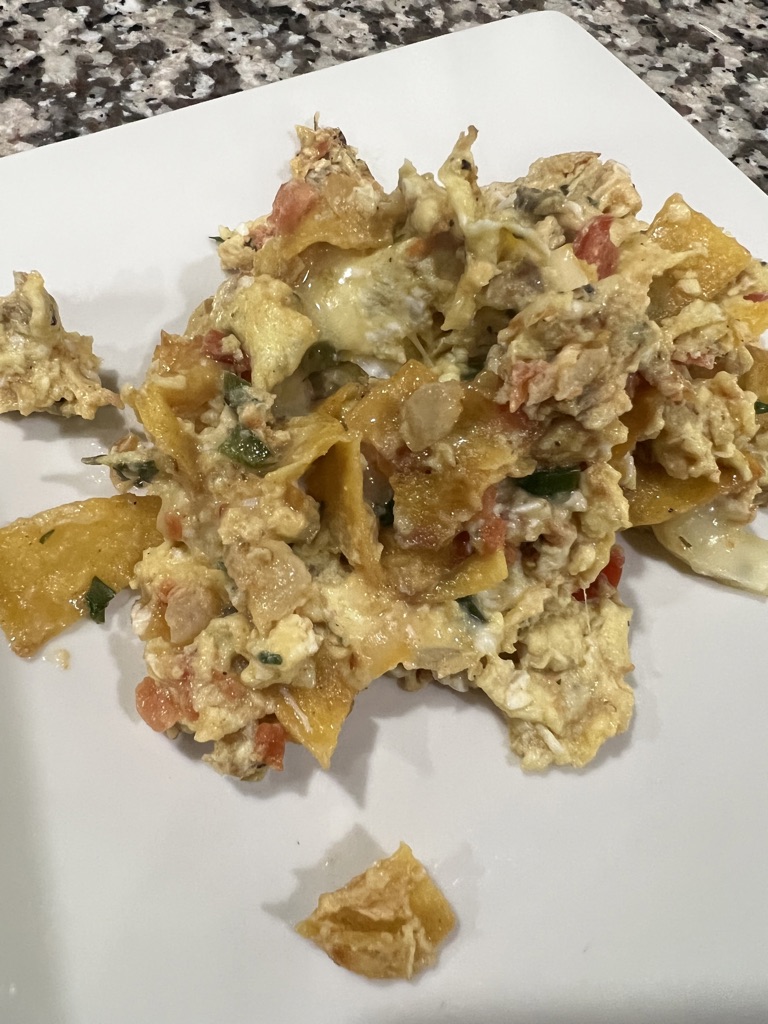
In Mexico, and in Texas, the dish is rather different. The ‘bread’ is stale, leftover tortillas. The tortillas are cut into pieces or strips, lightly fried and scrambled with eggs. It is not typically a meat dish. In Tex-Mex cooking, one often sees tortilla chips scrambled in eggs. I know it sounds rather strange, but it is very popular, very common. Tex-Mex migas are often accompanied by cheese and pico de gallo.

And so, in short, migas is a dish about leftovers, about using what you have. It is about inexpensively feeding a big family. To me, such recipes are great and old traditions. And, I always love the challenge of cooking to use leftovers. As good cooks, I think we should strive to minimize food waste – to be creative. It is the opportunity the empty the produce drawer for the week and to start fresh. I sometimes say about such dishes, “clean up on aisle 12!” My own migas are perhaps a blend of these migas traditions. I like to use leftover tortillas as I always have tortillas around. I like to include a lot of vegetables, more like a Spanish migas, because I like vegetables. I like the egg to be scrambled in a Tex-Mex style.

Given this is a dish of leftovers, I must tell you it is never exactly the same. I know. I may lose some of you who are uncomfortable without exact amounts and instructions, but stay with me. For the moment, let’s try to think in terms of ratios, and then in options, ok?

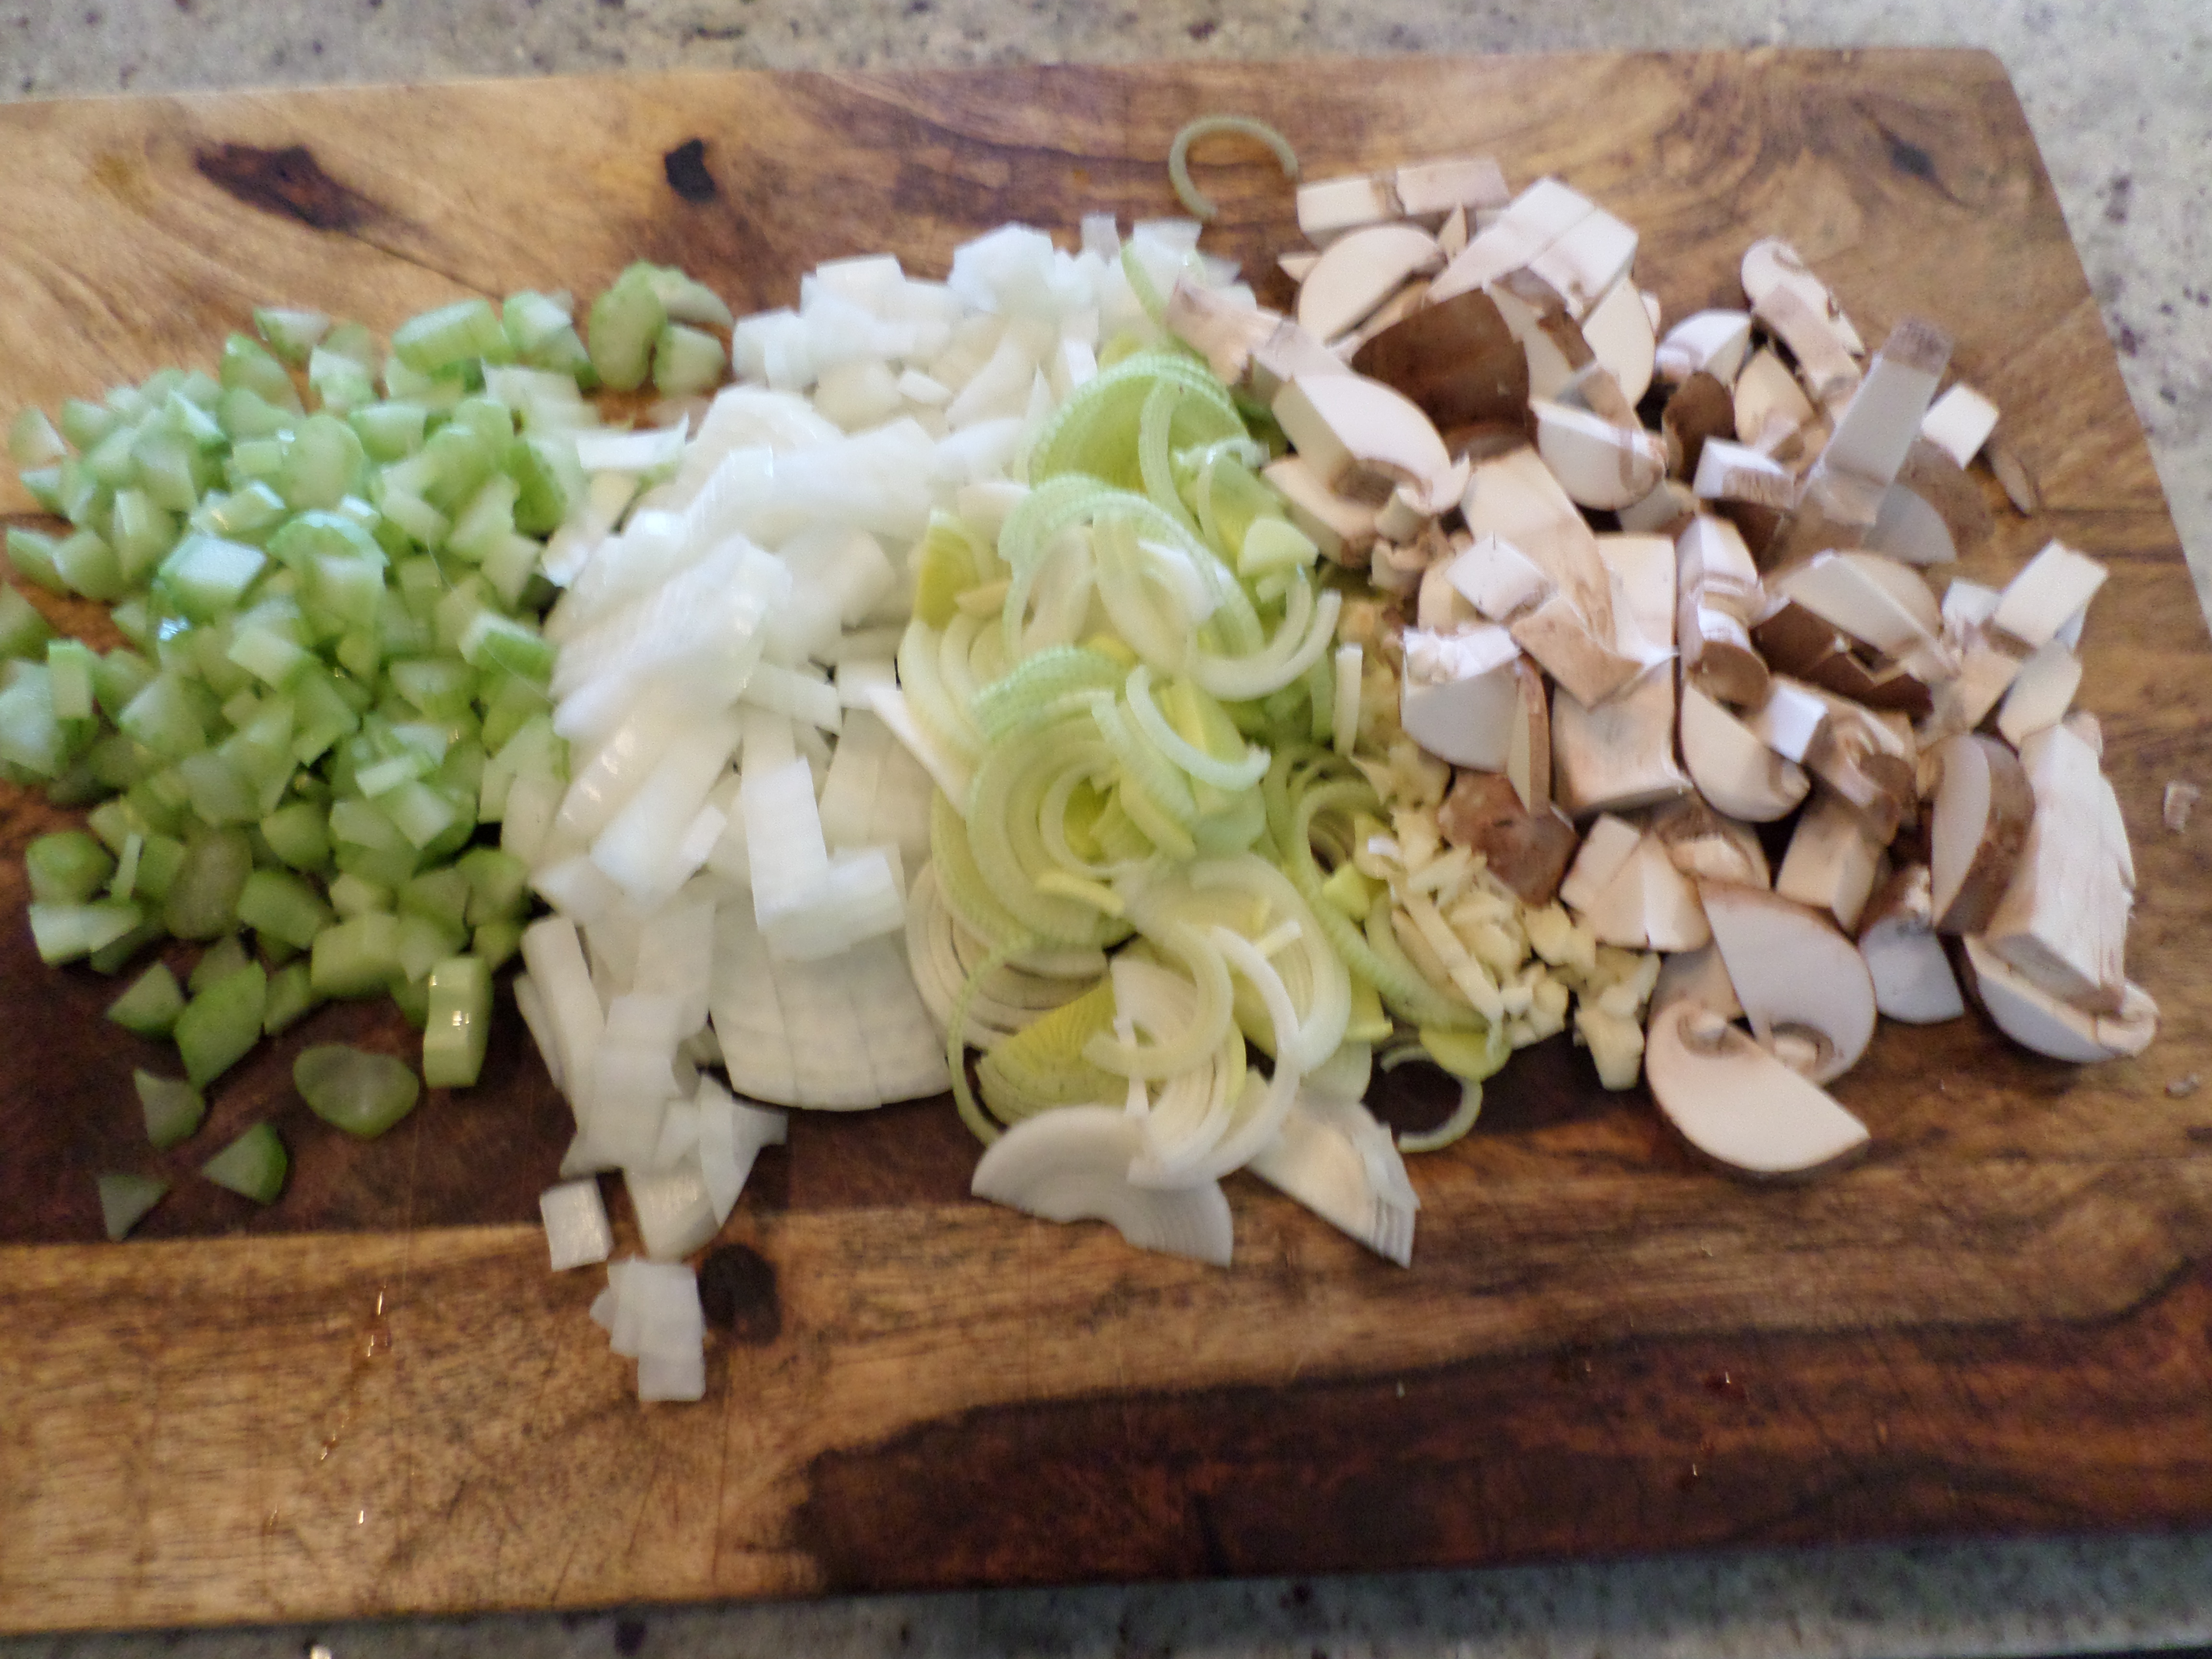
The basis for our recipe is 2 tortillas and 3 eggs for every 2 persons. Thus, for 4 persons, we will need 4 tortillas and 6 eggs. Then we begin to go through the crisper drawer! Half an onion? Check! A Roma tomato? Great! 2 jalapenos? Absolutely! Cilantro? Fabulous. A bell pepper? Why not? Again, thinking in terms of ratios, let’s then say that the total vegetable content should be upwards of, but perhaps not more than 2 cups (to the 4 tortillas and. 6 eggs). Dice them all finely and leave them sitting together on the cutting board.

Crack your eggs into a small bowl, salt and pepper, and stir them briskly with a fork.

You can use either flour or corn tortillas. But the choice does make the dish different: Flour tortillas make a softer dish and the corn tortillas make a rather heartier dish. I would not mix and match though, as they have different cooking times. Use only all flour tortillas or only all corn tortillas, and not 2 flour tortillas and 2 corn tortillas together. In Texas, it is common to see tortillas that are a blend of flour and corn (“Mixla” tortillas). Those are my favorite for everyday use. And they are great for migas. Cut all 4 tortillas in half and place them in a stack of 8 halves. Now slice them, still in a stack, the short way, into strips about ½ or ¾ of an inch wide.

Grab a roughly 12-inch skillet and put in a heaping tablespoon of butter and/or oil. I like to use half butter and half olive oil. Avocado oil works well too and has a higher smoke point. But I do like a hint of buttery taste on the tortillas. Bring the skillet and the oil to medium heat and drop in your tortilla strips. Spread them out the best you can to an even layer. Let these brown a little, then flip them over, or just stir them up and settle them back into an even layer, in attempt to get their other sides to brown. They should be lightly browned and slightly crispy.

I then push the tortillas to make a ring around the outer edge of the pan and I push my veggies from the cutting board into the center of the pan. While these are segregated, I let the water cook off of my veggies and I let them begin to soften. After a few moments, and seeing that the (mostly tomato) water has cooked off, I can begin to mix these together.

If you have any salsa (or you have made my cooking salsa), I often add about 2 heaping tablespoons to the center of the pan at this stage. And, again, I allow the liquid to cook off for a moment.

Then, I mix all the things together and I, again, push all the things to the outer ring around the pan leaving the center area of the pan open. I drop in a pat of butter, (but again, you can use any oil you like) and then I pour in my egg mixture. As the egg mixture starts to firm up, I give it a gentle stir with a spatula a couple of times, and then I begin to bring all the ingredients together, coating the tortilla strips and veggies with egg. Salt and pepper liberally at this stage. I also like a bit of cumin and/or chipotle chili powder. When the egg is almost set, I then sprinkle on a bit of cheese.

Not only is this a great use of leftovers before the big weekend grocery outing, it is also, “one -pot cookery.” You have only 1 pan to wash. This is a big favorite for my family and friends. I serve this by itself, with biscuits, with veggie sausage or with more tortillas.

Vegetexican Tex-Mex Migas

4 tortillas, either flour or corn

6 eggs, beaten, in a bowl and set aside

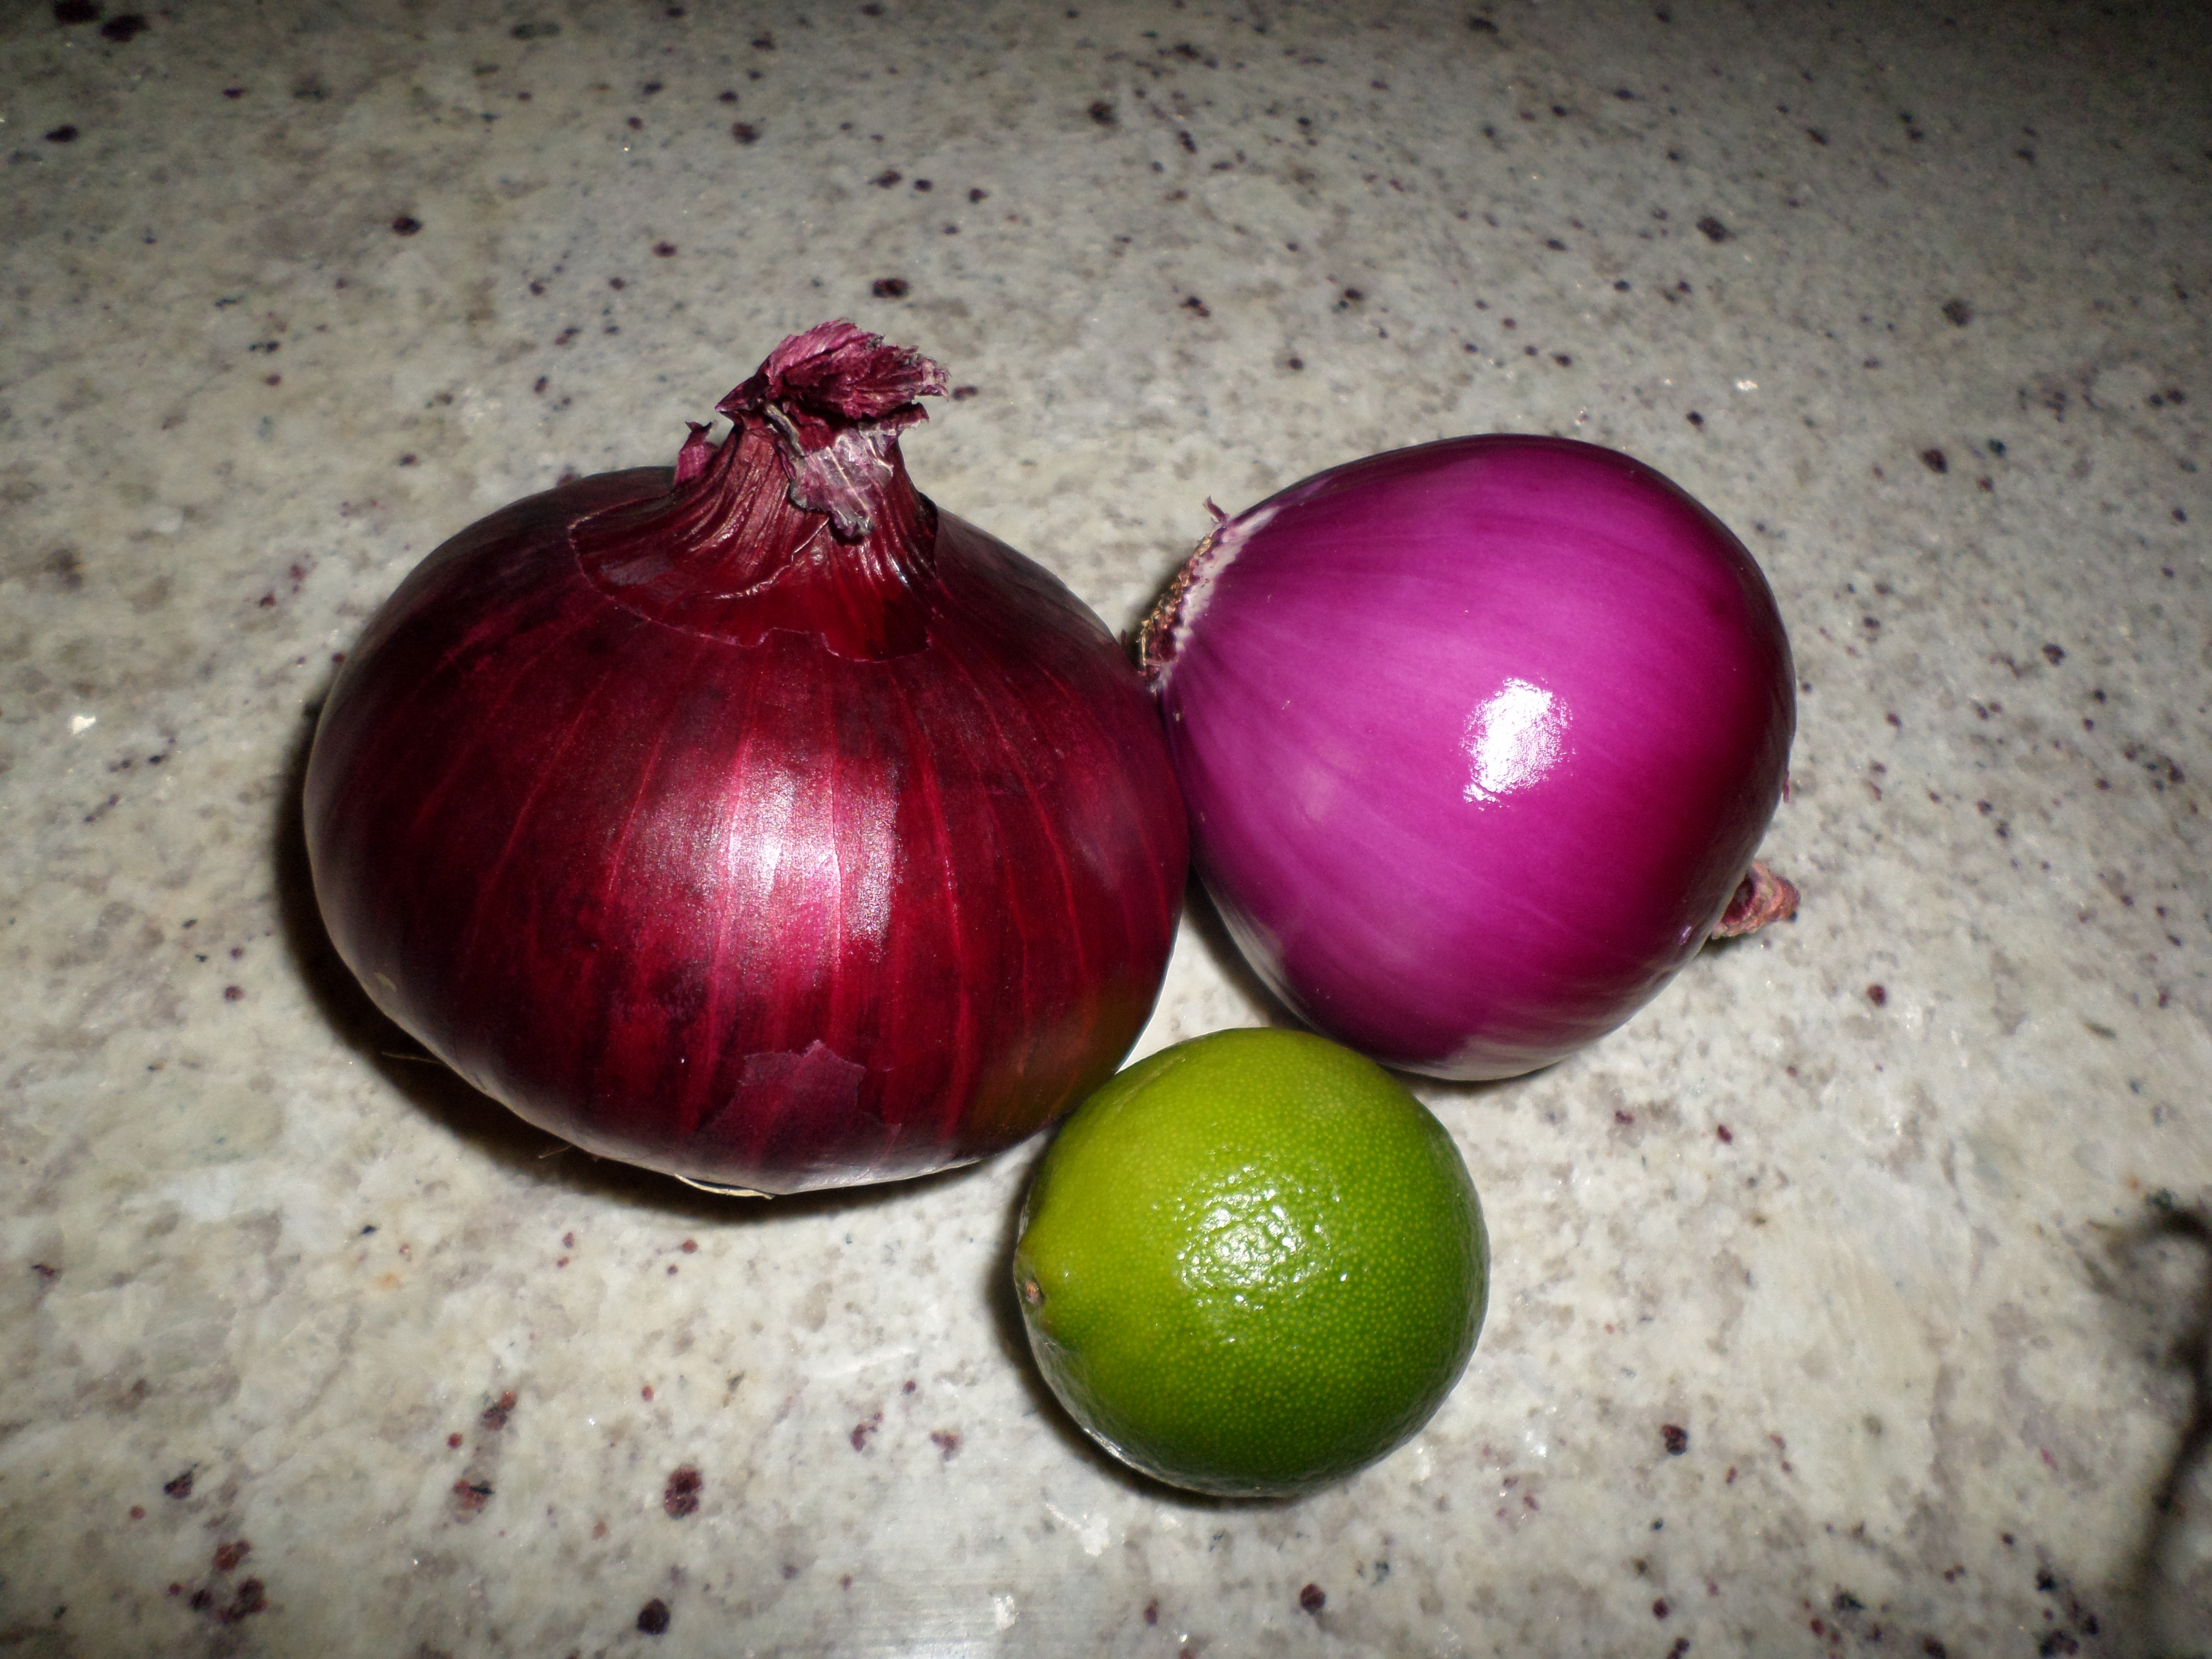
½ small white or yellow onion, finely chopped

½ bell pepper or poblano, diced

½ – 1 jalapeno, seeds removed and finely diced

And handful of cilantro, finely chopped

1 Roma tomato, finely diced, and/or 2 heaping tablespoons of my ‘cooking salsa’

½ teaspoon cumin

½ teaspoon salt

Optional:

Shredded Mexican cheese or cotija cheese

Mushroom and wild rice blend ‘risotto’

Of late, I am feeling very mindful about waste in the kitchen. I am trying harder to make optimal utilization of the food I buy and to keep my refrigerator and pantry fresh and clean. It means that I look for ways to work with what I have on hand. I look to make efficient use of my staples. I enjoy the challenge of being creative, and making something delicious, with a few simple things. And, less waste, saves money too.

There are certain staples that I always have on hand. In the refrigerator, I always have: carrots and celery. In the pantry, I always have: onions, garlic, some kind of potato, olive oil, dried mushrooms, dried beans, dried pasta and some kind of grain, often farro or a mixed wild rice.

Of these weekend/end of grocery cycle meals, I have a favorite right now, a kind of mushroom/onion/leek wild rice blend (and sometimes farro) ‘risotto.’ I switch it up a bit depending on exactly what I have, but it goes like this, here’s what I have on hand:

A leek

An onion

Garlic

A stalk of celery

1 sm. pkg. of dried porcinis

4 lg. “baby bella” mushrooms

Butter

Oil

Wild rice and brown rice blend

Black pepper

Truffle salt (optional)

Parmesan (optional)

I put my leek greens (just the upper middle section) and the onion top in a pan with about 2 cups of water and set that to boil. I put my dried porcinis in a small glass bowl and poured about 1½ cups of boiling water over them out of my kettle.

Then I dice up the following: ½ of the lower, mostly white, portion of the leek, ½ an onion, 1 stalk of celery, 2 cloves of garlic, my fresh mushrooms.

In a large skillet, I warm 1 tbsp of oil and 1 tbsp of butter (you can use only oil if you do not eat butter). I put all of the diced vegetable bits in the pan to sauté. Because I am Southern, I brown the heck out of these bits. I sauté them on medium-low about 15 – 20 minutes. If they start to stick to the pan, pour in just a little bit, maybe a quarter cup, of either of your stock preparations. When all is cooked though, this can remain on low.

I drain the dried mushrooms and save the stock or jus. I put these reconstituted mushrooms in the mixture in my sauté pan with my vegetable mixture.

I then strain the onion top/leek green stock and save that stock. Discard the onion top and leek greens. Then I combine the mushroom and onion/leek stock.   I measure out 2 cups of that stock. I measure about 1 cup of wild rice/brown rice blend. I then bring the stock and rice together to a boil in a small pot. After these come up to a boil, bring the temperature down to low and cover your pot with a lid. These need to cook about 45 minutes or until all the liquid is absorbed.

Alternatively, I have made this using half farro and half wild rice/wild rice blend. To do so, I cooked the farro and stock alone together for at least half an hour before I added in the other half of wild rice/wild rice blend. This is because the farro typically takes longer to cook. I actually like it a little better with this blend, but it is an extra step and takes a little bit longer.

When this is done, I add about 1 tsp of truffle salt or regular salt and about ½ tsp of black pepper. Then I garnish with Parmesan cheese.

The house will smell delicious! This is inexpensive, easy, healthy and super comforting food.

SAMSUNG CAMERA PICTURESSAMSUNG CAMERA PICTURESSAMSUNG CAMERA PICTURESSAMSUNG CAMERA PICTURES

Southern Pimento Cheese And Sandwich Bread

SAMSUNG CAMERA PICTURES When I was a kid, pimento cheese sandwiches were a typical weekend lunch. These sandwiches often accompanied soup, salad, crudité or fruit. I didn’t know that this was an exclusively Southern food until I moved to the Pacific Northwest. I never, ever saw pimento cheese there, or really, anywhere outside the American South (interestingly though, I have read that there is a Pilipino version of pimento cheese, but I have never had this). Pimento cheese sandwiches of my childhood were made of grated bright orange cheddar cheese, mayonnaise and a tiny jar of pickled pimentos. To any Southerner: a salad. For anyone unfamiliar, the pimento is a sweet red pepper. This was served on white sandwich bread with the crusts cut off – and, honestly, usually to old ladies and small children. For me, a serious cheese lover, this comforting food is a lifelong love.

I have seen many slight variations of Southern pimento cheese. Some seemingly not untraditional additions include: a bit of yellow mustard, some minced garlic, diced dill pickle, onion or shallot, or hot sauce. A typical ratio for a very basic recipe might be 2 cups of grated cheese, ½ cup of mayo and ½ cup of diced peppers.

The truth is that today, jarred pimientos are sometimes puréed and re-formed into strips, resembling the cut pepper, using a stabilizer. I tend against any such processed food and so, these days, I use a roasted or raw, but finely diced, red bell pepper. Likewise, I now try to avoid cheese with added coloring. I will say that I also tend against any recipes that add cream cheese. In my experience that was not traditional, and more specifically, I think it adds the wrong tang. Now that I am ‘all growed up,’ but still a pimento cheese lover, I like to add fresh herbs like thyme. I have added diced Roma tomato. I even once had a pimento cheese with broccoli sandwich, grilled.

And, more recently, I noticed a recipe that I really like. In The Southern Vegetarian, by Justin Fox Burks and Amy Lawrence, they make a pimento cheese with lemon zest, thyme, sharp cheddar, a bit of goat cheese, olive oil mayo, a diced red bell pepper, a splash of champagne vinegar, half a shallot minced and salt and pepper. This actually makes a lovely combo – and a slightly, if only slightly – grown up pimento cheese sandwich.

I hope that you will try a pimento cheese sandwich for yourself, or with your children and your grandmother. I think you do not have to be Southern, a baby, or an old lady to love a pimento cheese sandwich, served grilled or cold, on a weekend afternoon.

SAMSUNG CAMERA PICTURES

Gooder Than Grits

 My mom is a huge fan of yellow cornmeal grits. While she has been visiting these past several weeks, I have found both lunch and supper on the table waiting for me when I come home for lunch and after work. Truly, this has been such a pleasure. But yesterday, she put down the most flavorful small meal at lunchtime.

This meal of yellow cornmeal polenta with Parmesan and topped with stewed zucchini and tomatoes reminded me of a couple of childhood favorites in one.

It reminds me that when I was growing up, breakfast often meant yellow cornmeal grits swimming in melted butter. Today, I love greens on top or a poached egg on top… I have seen red-eye gravy on top. Shrimp and grits are quite common in the Carolinas where my mom is from. We did not eat our grits set up as polenta when I was a child, the way we sometimes do now.

It also reminds me dish my brother and I called “The Squish.” This was a cast iron skillet completely filled with slices of onion, rounds of maybe a dozen yellow, crooked neck and green zucchini squash with a can of Rotel tomatoes, cooked down until thoroughly browned. Then a couple of cups of grated cheddar cheese were spread over the top and the whole thing was placed under the broiler. Ridiculous. Delicious.

But this was a modest, simple meal. I love humble food, vegetables and grains.

Image

She started with:

2 tbsp olive oil

6 zucchini cut into rounds

4 Roma tomatoes, with the skins blanched off

6 cloves of garlic, sliced

1 tsp salt

1 tsp black pepper

1 ½ tsp Italian seasoning

a pinch of red pepper

2/3 c. yellow cornmeal grits (please consider organic or non-GMO)

2 cups water

½ cup dry grated Parmesan cheese

She placed the vegetables in a large sauté pan with the oil. She crushed the tomatoes over the pan in her hands. Then she seasoned the whole thing and placed a lid over the top. I would say she cooked this on medium low heat about 20 minutes. Toward the end she asked me to gauge how much liquid was left. If it’s too much, she said, “bring up the heat and leave the lid off.” More than a couple tablespoons of liquid, I guessed, was too much. I did as she asked.

For the grits, she prepared these simply, in a standard fashion. Boil the water and a pinch of salt, and add the cornmeal using a whisk. Keep whisking periodically. If you don’t, you can have undercooked lumps. When the grits have absorbed almost all the liquid, add in the Parmesan cheese. Apply some butter or olive oil to grease a 9×9 inch baking dish. Pour in your grits to let it set up into polenta. You could bake this slightly, or when it is set up, you can slice it and lightly fry the slices. You don’t have to and we did not on this occasion.

This was simply delicious. I always love tomatoes and Parmesan. This is also quite fresh and still filling.

I will really be sad to see my mom go home next week. It has been so nice both having meals ready for me these past weekdays and cooking together on the weekends.

Image

Pablano, named after the city of Puebla

On the weekends, when I have a bit more time, I feel most inspired to cook. One of my strengths as a cook is that I am not at all afraid to make stuff up – to play with my food. Imagining, and succeeding, or failing and trying again, has served me very well in the kitchen. My successes, and even more so, my failures, have taught me. Food inspires me. I imagine its flavors and colors. I imagine what I want it to be. I imagine how it can be its most delicious and its most nourishing.

Lately, I imagine pablano chiles and chile rellenos. However, I do try not to eat fried foods. Chile rellenos are usually pablano (named after the city of Puebla) or pasilla chiles (or, in New Mexico, hatch chiles), stuffed with cheese, coated with an egg batter and a fine corn flour. Then they are deep-fried. These are most often served with a red sauce. So, I have been playing with pablanos and vegetable fillings and cheese and sauces.

Allow me to tell you about today’s stuffed chiles experiment. It was pretty tasty!

I started by creating filling of rice and vegetables:

½ a small bell pepper, diced

½ a small onion, diced

3 – 5 medium mushrooms, diced

1/3 cup of frozen corn

½ cup of cooked black beans

¾ cup cooked rice

½ tsp onion powder

½ tsp cumin

½ tsp salt

½ tsp pepper

1 tbsp tomato paste

2 tbsp olive oil

I heated my skillet. I put in the oil. I sautéed the onion, pepper and mushroom together for several minutes, until the onion turned clear, and then I added everything else. I let it all get warm and soft and married together.

Then you will need 4 pablanos of roughly equal size. This is so that they will cook equally in the same amount of time. Cut open a slit, lengthways, into each one. Pull out the seeds, being careful not to break or tear the chile pepper. Stuff each one with the filling. Using a spatula may make this easier.

I made a chipotle and smoked cheddar cream sauce. I know. It’s a little rich, but it was truly delicious. You can omit the sauce, or use another, if you’d like. This was the sauce I made. I made a bechamel to start. Then I added spices, chipotle and a small amount of cheese. You will need:

2 tbsp butter or neutral oil

2 tablespoons of flour

1 3/4 cups milk or soy or nut milk

1 chipotle from canned (I tend to use 1 at a time, but there are several in a can and so, I freeze them and use them later.)

1 diced slice of smoked cheddar, or a vegan cheese like Daiya cheese, or not

1 tsp of oregano

½ tsp salt

½ tsp pepper

½ tsp onion powder

To make the béchamel, or white sauce, warm the oil in small pan on the stove top. Add the flour and combine these together. Let this mixture’s floury-ness cook a minute or two on medium heat. This is a white roux. Add the milk and everything but the cheese. Whisk this together and whisk it again every few minutes until it comes almost to a slow boil, but not quite! Just as it starts to bubble, turn the heat to low. It will begin to thicken. As it starts to thicken, stir in the cheese. Then, when the cheese is melted in, remove the dish from the heat. When you add shredded or grated cheese to a béchamel, it is then called a Mornay sauce, in French. But with the chipotle, I would not call it that at all. Maybe, chipotle crema?

I lightly oiled my baking dish. I placed some of the sauce in the bottom of the dish. I placed my stuffed pablanos in the dish and I drizzled some sauce over them. I then lay a slice I cut of fresh cheese over each one. Note that if f you are not using sauce or cheese, you may want to put a small amount of water or vegetable stock in the bottom of your dish. I then put a foil tent over the top of the dish and I baked it in the oven at 375 degrees for 40 minutes.

When finished, my stuffed pepper was delicious with a small dollop of sour cream.

ImageImageImage

Coffee Reminds Me

Both of my grandmothers were German Americans. One, my maternal grandmother, was from Georgia, and the other, my paternal grandmother, was from New Orleans, Louisiana. Both had a love of coffee. Both served coffee to me as long as I can remember, perhaps as long as I could seat myself at the table. Coffee is an earliest memory for me.  It is an earliest ‘food memory’ for me. It is rich and something like bitter chocolate.  I confess I like it strong, and dark and toasty, almost burned, but not quite.  My mother’s mother put in a heaping spoon of sugar, filled the cup halfway with coffee and halfway with cream. It was the palest color and deeply sweet. Sometimes I drink coffee this way to remember. My father’s mother brewed coffee in an old enameled brew pot with chicory root on the stove top. I still have her coffee pot. Her coffee was dark and thick, but smooth, and served in little cups, demi-tasse cups, with a sludge on the bottom, like a Turkish coffee. It was served simply. She drank tiny cup after tiny cup, until it was a few pots per day. A coffee with chicory reminds me.

Vegan BBQ in Austin?!

You may be surprised to learn that Memorial Day is not, in fact, National BBQ Day. And, yet, many of us choose this day to honor our nation’s veterans and fallen heroes – and to cook outdoors.

Here in Austin, and in the greater central Texas region, there certainly is an abundance of BBQ every day. And you know we love our food trucks too!

My friend Julie and I set out to find vegan food trucks and, in particular, vegan BBQ.  Julie has been a happy and healthy vegan since we took a wild trip to India several years ago, and she got really sick! A clean vegan diet finally allowed her body to really recover.

We found a great vegan BBQ place! They opened last year and seem to be doing fine! BBQ Revolution, whose slogan is “All the Grillin,’ None of the Killin,’ is located at 701 53rd St., in a pod with other mostly vegan food trucks. So, we decided to go over and check them out.

They have a classic menu. A plate is $9 and a sandwich is $6. You can get vegan ribs, brisket or soy curls. We asked to sample each and they kindly agreed. These guys are really nice guys. They use local ingredients. Everything had a great smoky flavor and is smoked on site. We had a choice of 2 sides. We tried the mac and the coleslaw. It was nice to have a slaw that was not smothered in mayonnaise. They also have beans and potato salad available. And, as is typical here, the BBQ is served with a slice of dry white bread. I felt right at home.

Image

I don’t eat smoked foods often these days, but for those who on occasions, such as Memorial Day, miss traditional foods made with meats, this is a terrific no meat treat. Go check them out! And, hurry, because they do sell out!

Image

Tamale Tradition

When I started my blog, I wrote about Tres Hermanas, the Three Sisters, and the early origins of New World food. I find myself deeply interested in the origins of food in general and of New World foods in particular. How can I connect my own earliest food memories with the food I know today? And can I connect my own history to earlier American people and traditions?

My mother’s parents were restaurant people.  When my mom was a girl, my grandparents had a hamburger stand on the side of the road, Mr. B’s Burgers.  My mom met my dad, who was bagging groceries at the grocery store, when she would shop for staples for their roadside business.  When I was a girl, my grandparents had a Mexican restaurant.  My grandfather had developed a passion for Mexican food.  And as they neared retirement, they became restaurant inspectors for a chain of Mexican restaurants.  I remember hot summers driving across Texas in my grandfather’s station wagon, for his job, stopping at various Mexican chain restaurants along the way. 

This is a small part of how I learned about Mexican food. We ate rice and beans, enchiladas, tamales, chile rellenos, sopaipillas, flautas, queso… At home he grew chilies and tomatoes in coffee cans. Spring onions were served raw with such meals and set on the table in canning jars… These things contribute to my own earliest food memories.

Early North Americans began to make dough from corn using a process called nixtamalization. It means that the corn kernels were soaked in water and lime (the mineral, not the citrus fruit) until the coarse outer skin of the corn kernel loosened from the soft meal of the corn within. Through this process of nixtamalization, the niacin within the corn becomes accessible to the consumer. The corn could then be cooked and eaten, or re-dried as hominy, or it could be ground into a masa or dough. This dough, for examples, would be used for tamales and tortillas.

Though this was the process for hundreds of years, I certainly don’t know anyone who does this at home today. If you’re down to try, I’d seriously like to come over and check you out…

Today, one buys a big bag of masa harina at the market and hopes to be lucky enough just to find non-GMO, if not organic. How do we take this dry corn meal – and make a lovely dough comparable to the healthy, native nixtamalized corn masa?

The primary ingredients for tamales today are the masa harina and a solid fat – traditionally, lard. Vegetarian and vegan versions of this Native American food are typically made with shortening. For many of us who are trying to eat mindfully, these fats, and hence, tamales too, may be off the menu.

For me this was rather heart breaking. This is a food I grew up with, an incredible comfort food. But, in truth, I had no hope of any healthy alternative. I didn’t even look. I tried to write off the tamale. I felt that without a considerable amount of solid fat, the steamed tamale would never have the desired light, fluffy consistency.

Then someone sent me the Mayo Clinic’s tamale recipe. Seriously. Mayo Clinic. “Mayo Clinic” and “tamale” felt like a ridiculous and cruel non sequitur to me. Everything about it smelled like mothballs and disappointment, I imagined… I felt sort of geriatric and somehow insulted. I had no hope that this could be anything other than a heavy failure. I still don’t know why I even tried it.

Ignore for now the filling they suggest – there are infinite possibilities for us with the right masa! And this masa does work!

What made this masa work was the inclusion of thawed frozen corn kernels processed in a food processor with the masa harina. This, with the addition of some water (or broth), only 3 tablespoons of oil (comparatively little! They recommend canola, which I dislike. Try safflower oil.), and a lifting agent, a teaspoon of baking powder – made for a dough with a fluffy and light body of soft corn meal. I was truly impressed.

To anyone who suggests that this recipe might be ‘less authentic’ when compared to other contemporary variations of tamales, I am going to suggest that the opposite may be true. Because the corn is blanched, frozen, thawed and processed in the food processor, the kernel of the corn is broken down and less fat is required. This may be more authentic, as the earliest versions of this dough had no added fat.

Please try them. Fill them with roasted vegetables or beans or chilies and cheese… or all of these. Tamales freeze and re-steam so nicely. I believe they present a healthy alternative with all the comfort, flavor and body of the native food.

Escabeche De Cebolla/Mexican Pickled Red Onions

I love Mexico, I love Mexican food, and especially, I love the Yucatan.

Merida, the humble capital of the Yucatan, is one of my favorite cities. I love the nearby access to the pyramids and the Native American history and culture. I love the colonial Spanish architecture of the Merida Centro, the diversity of the population, the freshness of the food… I love the Yucatan’s nearly white beaches and the azure water. Some will love the access to so much fresh seafood.

When I put Mexican food on my table, I almost always have a bowl of Mexican pickled red onions. This condiment, a sort of pickle relish, comes from the Yucatan (and has been traditionally paired with seafood, often fish tacos).

I adore both its brilliant pink color and its bright flavor. I have seen, and made, many variations: Sometimes the onions are blanched, sometimes they are added raw, sometimes the flavor is quite clean and sometimes spices, like earthy cumin may be added… This is the way I have tended toward making the onions of late.

I suggest that you make this a few days ahead, so that the flavors have time to combine – and the onion sort of pickles and crisps.

You will need:

¾ cup boiling water

½ teaspoon salt

1 medium red onion

10 black peppercorns

1 bay leaf

½ teaspoon oregano

½ teaspoon cumin

½ teaspoon sugar

1 and ¼ cup red wine vinegar

½ small lime, juiced

A small – medium glass jar with a lid, e.g. holds about 2 cups or so of liquid

A mandolin slicer is highly desirable (and I suggest you either buy a cut-resistant glove, or just put the band-aids on before you get the slicer out of the box).

A fine mesh colander

First, cut the top off of your onion. Trim the root so that you have removed the root fibers without cutting far into the flesh of the onion. Then, cut your onion in half from pole-to-pole/top to root. Lay the half rounds so that the flat surface is down and either run the flat top against the mandoline’s blade or make thin, horizontal slices with your knife. In a small pan, boil the water and add the salt. When the water comes to a boil add in the onion slices and stir to just coat the onion with the boiling water. You are not cooking the onion. You are just barely blanching it. Drain the onion using a fine mesh colander.

In the glass jar combine, the onion, the peppercorns, the bay leaf, the oregano and cumin, the sugar, and then, pour the vinegar over the top of these. Squeeze in ½ a lime.   The jar should be nearly full. If it is not quite full, it is ok to add a little water. Put on the lid and shake everything up to combine well. Take the lid back off of the jar and allow the mixture to cool thoroughly for an hour or so. Then, put on the lid, give it another good shake, and place it in the refrigerator. Leave it over night. You can serve these as soon as the next day. I think it is best a few days later. The onion will lose its sharpness and the flavors will develop over a few days.

Serve these onions with any tacos. I sometimes even put this on my vegetable enchiladas. I also regularly serve these on salads. I absolutely love these with cooked greens!

SAMSUNG CAMERA PICTURES SAMSUNG CAMERA PICTURES SAMSUNG CAMERA PICTURES SAMSUNG CAMERA PICTURES SAMSUNG CAMERA PICTURES

The Humble Black-eyed Pea Salad

As much as I love to eat my vegetables, and really all vegetables, I am not a fan of iceberg lettuce salads, nor even, any mostly lettuce salads. I like big, hearty salads, kale salads, roasted vegetable salads…
My mom’s favorite salad is a black-eyed pea salad. I love this salad too, for its heartiness, for its flavors and for the healthy fat in its avocado. My parents are at my house, visiting, and my mom wanted to make a dish to take to her church this weekend for their potluck. I think this one is a great choice when one needs to bring a dish to a potluck or party.
She and I each make this salad a little differently than the other. Today, we made her classic style – and below, I suggest variations that I tend toward.

The salad itself – and nothing need be exact about any of this – includes:
2 cups of fresh or thawed from frozen corn kernels
2 cups black-eyed peas or 1 can, rinsed (I use dried, cooked the day before and rinsed, but my mom prefers canned and rinsed) (I also sometimes use 1 cup of rinsed black-eyed peas and 1 cup rinsed black beans)
1 pint of cherry or grape tomatoes, halved
½ medium – large red onion, diced
1 medium – large avocado, cubed
1/3 – ½ cup chopped fresh cilantro
Optional: I also like halved or quartered green, pitted olives, maybe 1/3 – ½ cup. I also add a diced bell pepper. If you like heat, you could add a thinly sliced jalapeño.

The dressing includes:
2 tbsp. olive oil
¼ cup red wine vinegar
½ tsp. salt
½ tsp. pepper
¼ teaspoon each of garlic powder, cumin, oregano
Add several good dashes of hot sauce

Once the vegetables are chopped, the hardest part is over. This is so easy. Combine all of your vegetables in a large bowl. Combine all of your dressing ingredients in a small bowl and whisk them together. Pour the combined dressing over the vegetables and gently combine. You can serve this immediately. I prefer to let it marinate together overnight. This will serve ~6.

Truly, it is a humble, but healthy and flavorful dish.

SAMSUNG CAMERA PICTURES